Sunday, January 29, 2012

Day 13

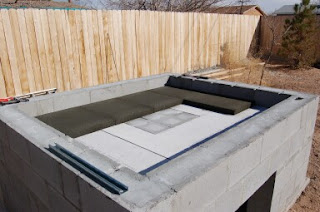
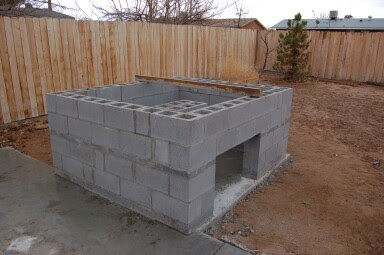
Day 13 turned out to be more productive than we initially thought. Tom was able to get the final frame bracket in place, and the beginning stages of preparing for the hearth base have begun.


These pictures show that there is only one layer of Cement Board. In the end, two layers were actually used. Using two layers will make up some distance that will be needed when cement is poured for the hearth base.


FOAMGLASS!
Finally, the day arrived for this funky product to be put in place. It has an odd smell, like sulfur. It's rigid, yet soft. Strong but fragile. It reminds us of pumice stone but not as hard. And when you put it in place, and it rubs together, it reminds me of finger nails on a chalk board!


The Foamglass was very easy to cut.

We still have one more shipment of Foamglass coming. It will be place directly on top of the first layer. We're hoping that the shipment will arrive early this week so that Tom can start to work on the forms for the hearth base cement pour next weekend.


We want to take this time to welcome all our new followers. We really are encouraged by all the inquiries we've received and we enjoy keeping you up to date on the progress of the BakeHouse.
So until next time - be well - Kath

Thursday, January 26, 2012

Day 12 1/2

Paper Work!


Day 13 looks like it might be a challenge in coming together. Only 1/2 of the Foamglass order arrived yesterday and we're not sure if the rest of the order will come in time for Tom to get the base in place. The forms actually have to sit on top of the Foamglass, so he's planning on doing what he can if the second shipment doesn't make it from California.

In the meantime . . . I decided that it was time to go through all the BakeHouse order forms & flyer's that we used in New Jersey and get them all updated with our new information. In doing so, it was like taking a trip back in time. As I updated the Wholesale order forms for the NJ Shops that carried our bread, I did get a little bit of a lump in my throat. The bread forged so many precious friendships. I'm grateful for the age of Social Network that enables us to keep in touch so easily! So a shout out to Michelle at Nature's Harvest in Blairstown, NJ; Brant and crew at The Health Shoppes in Morristown and Chester, NJ and Reid and crew at the Sussex County Food Coop in Newton, NJ. And to all the customers that enjoyed our bread, you are all in my heart as we're rebuilding the BakeHouse here in New Mexico. Thoughtfully - Kath

Monday, January 23, 2012

Day 12

A change in the plan . . . . .
All week long Tom had a plan in his head on how he was going to create the support for the hearth bed. With the Foamglass arriving this Tuesday he wanted to get the support base welded and the forms cut and inserted so that next weekend we could pour the cement base and insert the re bar for the hearth bed. Well, Friday night came and Tom realized that although his idea of a steel support base was what he wanted to do, working with a rigid welded frame would not give him any flexibility to work with the little inconsistencies of the block foundation. And in the end not allow for him to get the support base level.

Our 2006 Oven Base
This is what Tom did with our original oven in 2006. After the base of
cement mixed with vermiculite was poured and the hearth bed set, the wooden
base was then removed from the bottom.

Now that it was Saturday, and all of the contractor supply houses closed for the weekend, we found ourselves at the Big Box stores getting the SuperStrut product that Tom decided would be a better choice for base. We ended up buying out the product at both Home Depot and Lowe's!

Tom cuts the channels to length
Each channel is bolted to the side of the foundation wall


The channels are all bolted together


The frame taking shape

Securing all the channels

An almost completed frame. Just a few more channels will need to be added.
In the end, we're pleased with the change in plan. With just a little more work to finish the support frame, Tom will be able to build the forms this coming weekend and then we'll plan on pouring the hearth bed on the weekend of 2/4.

Thanks for stopping by and we look forward to getting you next weeks update.
Kath

Monday, January 16, 2012

Day 11

This weekend was all about cement - one ton of it!


Before we could start mixing cement. Tom needed to cut out all the center supports of each block on top of the oven foundation so that they could then be filled with cement and re bar.


Once the center of the block was cut on each side, it was easily knocked out with a hammer.

A complete open channel now existed around the
top of the oven foundation.


With the channel clear - the re bar is positioned around the top of the foundation. This will act as a support when the oven expands and contracts with each firing. The re bar will help stabilize the oven so the walls are not pushed out.

The re bar was then removed so that the channel could be partially filled with cement. Then the re bar was repositioned on top of the wet cement and then covered with cement. It would be totally embedded as shown in the photos to follow.
Small notches are now created with the saw on the inside two opposite edges of the oven foundation so that re bar can be laid across the opening. The notches will also allow for expansion and contraction of the oven.


Tom confirming that the notches would be wide enough to allow for the re bar to move back and forth.

After all this prep work, we were ready to start mixing cement. We were thrilled to find out that one of Tom's co-workers actually had a cement mixer that he graciously offered for our use for as long as we needed. What a blessing.

The mixing station all ready to go
The first section to be filled with cement is the center support column. I used re bar to work the wet cement down in to the openings and help to remove any air pockets. 
Hey - look what I was doing in 2006!
As I filled the channels with cement, Tom smoothed it out and positioned the re bar. He worked the cement in until we had it flush with the top edge of the oven foundation.


Smoothing out the cement in the channel. 
 Once finished, we had a nice smooth top.
We mixed and used a total of One Ton of cement!

After the cement had some time to set up, we took a piece of re bar and made an impression in the cement that will act as a channel for the re bar to be able to move as the oven contracts and expands when being used.


Time to say good night.
Tom and I are both very encouraged with what we got accomplished this weekend. Next weekend looks to be just as exciting and we look forward to sharing it with you. Thanks again for stopping. Thoughtfully, Kath & Tom

Sunday, January 8, 2012

Day 10

This week I started gathering all the document information that needs to be filled out and sent to Santa Fe for the BakeHouse. A visit to the Tax office and also my accountant proved to be wise since I found out that the offices in Santa Fe are running at least 3 months behind in getting new businesses their Public Regulation Commission number, which is needed before I can get our EIN number! If it all works out the way they foresee, we'll have what we need at least a month before we start baking! 


Tom was also able get the load of Sand and Gravel mix that he'll need to finish off the oven foundation and to add to the Lumnite for the laying of the hearth bed. We found a company locally that sold the Sand and Gravel already mixed in the proportion we needed. It proved to be a lot more cost effective this way rather than buying the sand in bags and getting a load of gravel delivered like we had to do in New Jersey.

Copper doing his job of inspecting the load. He's such a Corgi.

The most exciting part of the day was they placement of the final block in the oven foundation!


The final block getting tapped in place
The finished oven foundation. It's still hard to believe that we're ready to move on to the next phase. The top row of block will now be filled with concrete and then Tom will start the foundation for the hearth bed. This week we'll be ordering the Foamglass Insulation and we're hoping that the Winter Storm that is rolling in tonight will work itself out and clear off for another beautiful weekend next weekend.


We've had to cover the sand and gravel pile since the rain,
wind and snow are suppose to start tonight. New Mexico
weather is a bit cranky lately!
We're looking forward to sharing the next phase of the oven construction with you.  So until next weekend, thanks for stopping by. Kath

Monday, January 2, 2012

Day 9

HAPPY NEW YEAR! After a wintry two weeks we celebrated New Year's Day with family and had clear blue skies and temperatures reaching 65°! What a treat. Even with the Christmas and New Year holiday, Tom was able to spend some time working on the oven.


Custom cut in block to fit over ash dump lintel


Center support column


The view of the BakeHouse from our bedroom window - it's so exciting!

Where the project stands at the end of New Year's Day 
Bradley and Petie worn out from all the celebrating.
Tom was a bit worn out too. The remote is in his hands, but his eyes were closed:)

This coming week the Foamglass will be ordered and the final course of block will be laid. Then the hearth bed will begin! Thanks again for stopping by. Kath